
How to root Xperia L1 & Install Recovery
Today we're going to show you how to root Sony Xperia L1.
Sony Recently launched their new smartphone Sony Xperia L1.
Xperia L1 launched in March 2017 Known as a mid range android device .
As you all know Sony comes with their own UI (User interface) which many users like many won't so they chose to use 3rd party launchers and other crap like that..
Well you don't need to anymore...
Today we'll show you how to get root access of this device and enjoy all hidden features of android device such as Custom Roms , Custom Recovery, and thousands of customization's and power methods by thousands of rooted apps.
What you need to do ?
Nothing just follow this simple tutorial carefully and enjoy...
Downloads / Requirements
- Kingoroot App for PC ( This app can be used by mobile also but we prefer PC method.)
- ADB Drivers for PC
- TWRP Recovery ( Coming Soon )
Steps :-
- Download all required files from downloads.
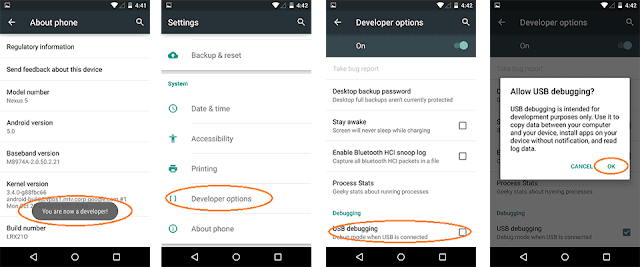
- Enable Developers Options from Settings/About Phone/Tap Build No 5 Times.
- Now enable USB Debugging from Settings/Developer's Options/USB Debugging.
- Install ADB Drivers and Kingoroot app on your windows PC.
- Launch Kingoroot application.

- Connect your device to PC via USB cable.
- Kingoroot will auto detect your device, if not try to reinstall ADB drivers properly.

- After device detection HIT ROOT Button from Kingoroot App.

- Do not interrupt process during execution.
- That's it....!
- You've successfully rooted your Xperia XZ1.
- Install Root Checker app to verify root access.


0 comments:
Post a Comment