 |
| How to root Gionee A1 |
Welcome,
Today we're going to show you how to root Gionee A1 & Gionee A1 Lite.
Gionee A1 lite is a latest launch from gionee mobiles, Both devices are commonly famous in smartphone market right now for its great specification.
Gionee devices comes with a very powerful hardware which makes device even great after getting root access to it.
Today we'll discuss & share tutorial about both devices.
before you process you should know what is root & what are the advantages & disadvantages of rooting your android device.
Note:- We're not responsible if anything happens to your device, so do it on your own risk.
1) How to root Gionee A1 & Install Recovery
Downloads & Requirements
Note :- This Method requires Unlocked Bootloader. It will not worked on locked bootloader.
- Windows PC (Win 8 or Above Recommended)
- TWRP Recovery for Gionee A1
- SuperSu Zip (Copy this file in your internal device)
Steps :-
- Turn on your pc & get your gionee usb cable and don't forget to take backup.
- Download & Install All files from download section.
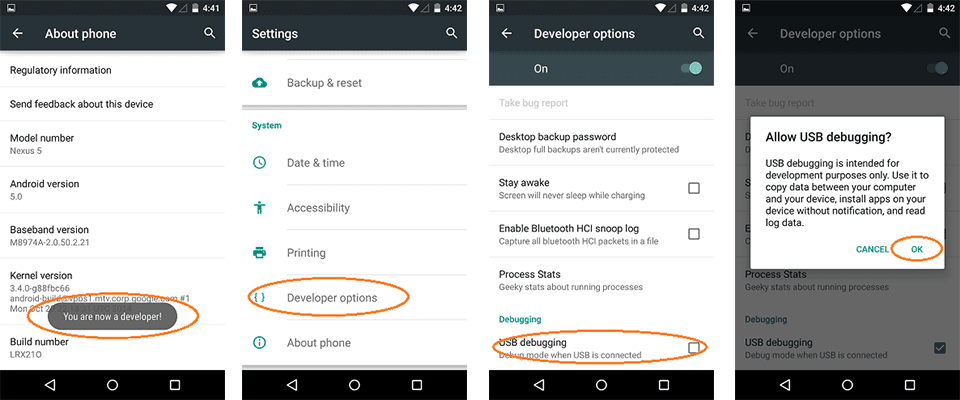
- Enable Developers Options from Settings>About Phone>Tap Build No 4,5 times.
- Enable USB Debugging from Settings> Developers Options> USB Debugging.
- Copy the TWRP Recovery File on your ADB Folder.
- Now turn of your device go to fastboot mode by pressing Power + Vol Down.
- Now your on fastboot mode.
- Go to adb folder where you copied recovery file.
- Now click shift + right click you'll see the open command window here option as shown in image.

- Open command window.
- Connect your device to pc now.
- Type following command to check if your device is connected properly or not.
adb devices
- You'll get the device code which will be like ae14ad565 like this or anything that means your device is connected properly.
- Now type following command to flash twrp recovery on your device.
fastboot flash recovery recovery.img
- This will flash your recovery .
- Now go type this command to reboot your device .
fastboot reboot
- That's all you have successfully installed twrp recovery.
 |
| Demo Image |
- Now boot into recovery by pressing Power+ Vol Up
- Go to Install.
- Locate SuperSu file which you have copied on your internal storage.
- Flash SuperSu.zip through twrp recovery.
- That's it you've successfully rooted your device.
- Install Root Checker to verify root access.

2) How to root Gionee A1 Lite Without PC
Twrp Recovery method is still under development for lite version so you may try this method.
Downloads/ Requirements
Steps :-
- Enable Unknown Sources from Settings>Security>Unknown Sources.
- Install Kingoroot App to your device.
- Launch Application.
- Let application verify your device.
- HIT Root Button.

- That's it

Comment for Queries.................!!!!!!!!


0 comments:
Post a Comment